
Have you recently applied for a new Aadhaar card at an enrolment center or submitted a request to update your name, address, date of birth, mobile number, or biometrics? You can easily check aadhaar status online in less than a minute through the official My Aadhaar Portal. Instead of visiting an Aadhaar Seva Kendra repeatedly, the Unique Identification Authority of India (UIDAI) provides a real-time online tracking dashboard where residents can check the exact stage of their application.
Check the live status of your new Aadhaar application or demographic/biometric update request using your EID, SRN, or URN.
✓ No Mobile OTP Required for Enrolment/Update StatusThe best part about the online check enrolment / update status tool is that it does not require a mobile OTP—you only need the acknowledgement slip given to you at the time of application. Below is a complete step-by-step guide explaining how to format your 28-digit Enrolment ID (EID), Service Request Number (SRN), or Update Request Number (URN), what each verification stage means, and what to do if your request gets rejected.
Which Reference Number Do You Need to Check Aadhaar Status?
Depending on whether you enrolled for a brand-new card or updated an existing one, UIDAI issues a specific tracking number on your acknowledgement receipt. Before you check aadhaar status, identify which of these four numbers you have:
| Tracking ID Type | Format / Length | When Is It Issued? | Where to Find It? |
| Enrolment ID (EID) | 28 Digits (14-digit ID + 14-digit Date & Time) | New Aadhaar enrolment or biometric/mobile update at an Aadhaar Seva Kendra. | Top-left corner of your printed Enrolment Acknowledgement Slip. |
| Service Request Number (SRN) | 14 Digits (Starts with S followed by digits) | Online address update, document upload, or PVC card order on the My Aadhaar portal. | Displayed on the payment/acknowledgement PDF receipt and sent via SMS. |
| Update Request Number (URN) | 14 Digits (0000/00XXX/XXXXX) | Demographic updates submitted online or at an enrolment center. | Printed on the Update Request acknowledgement slip. |
| SID (Service ID) | 28 Characters (S + 13 digits + 14-digit Date/Time) | Certain offline/assisted update requests at Seva Kendras. | Printed at the top of the Update Acknowledgement receipt. |
How to Format Your 28-Digit Enrolment ID (EID) Correctly
The #1 reason users get an “Invalid Enrolment ID” error when trying to check aadhaar status is entering the date and time in the wrong order.
On your physical acknowledgement slip, your EID is split into two parts:
- 14-Digit Enrolment Number: Written as
XXXX/XXXXX/XXXXXon the left side. - 14-Digit Date & Time Stamp: Written as
DD/MM/YYYY HH:MM:SSon the right side.
Important Rule for the My Aadhaar Portal: When entering the 28-digit EID in a single box (or selecting it), the Date and Time must be entered in reverse chronological format: YYYYMMDDHHMMSS (Year first, then Month, then Day, followed by 24-hour Time), without any slashes (/), colons (:), or spaces.
- Formula:
[14-Digit Enrolment No]+[YYYY]+[MM]+[DD]+[HH]+[MM]+[SS]
Step-by-Step Process to Check Aadhaar Enrolment & Update Status Online
Follow these simple steps to track your application on the official UIDAI portal:
Method 1: Check Aadhaar Status Using 28-Digit Enrolment ID (EID)
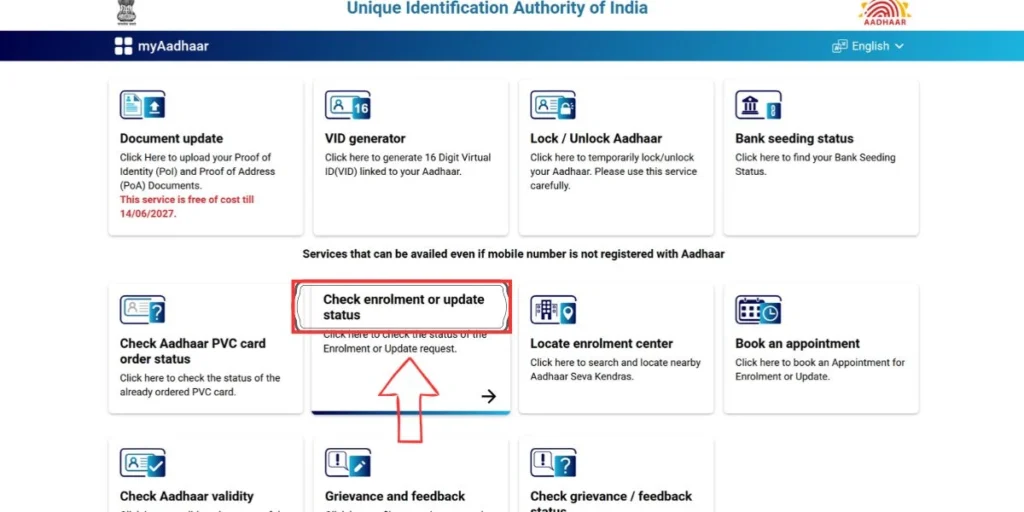
- Visit the official My Aadhaar portal (
myaadhaar.uidai.gov.in) and click on the Check Enrolment & Update Status card.
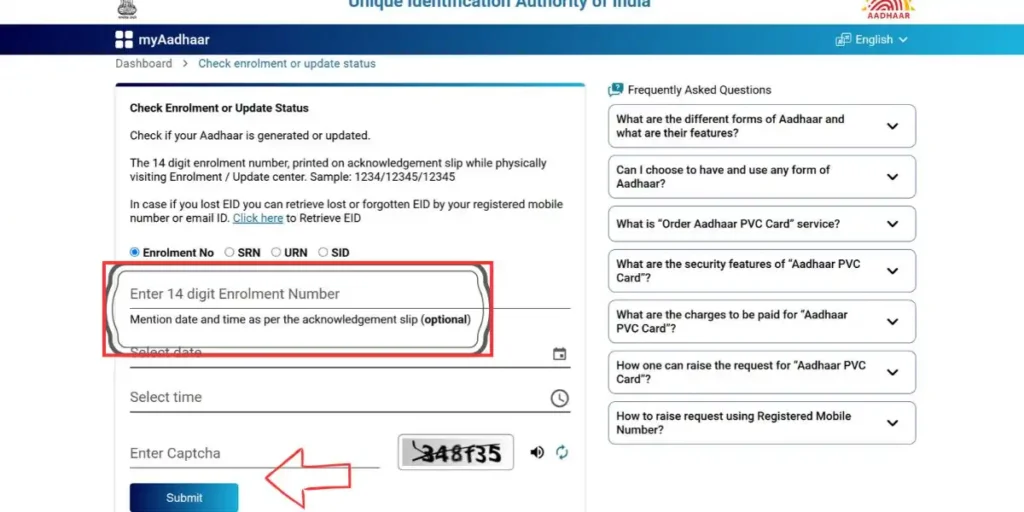
- Select the option to enter your Enrolment ID (EID).
- Type your 14-digit Enrolment Number without any forward slashes (
/). - Use the calendar icon to select the exact Date and the clock icon to select the exact Time (HH:MM:SS) printed on your acknowledgement slip (or type the full 28 digits in
YYYYMMDDHHMMSSorder). - Enter the security Captcha code displayed on the screen.
- Click on the Submit button.
- A visual progress bar will appear below, showing the current stage of your Aadhaar generation or biometric update.
Method 2: Check Aadhaar Update Status Using SRN or URN
If you updated your address online by paying the ₹ 75 fee or uploaded Proof of Identity/Address documents, you can check your status using your SRN or URN:
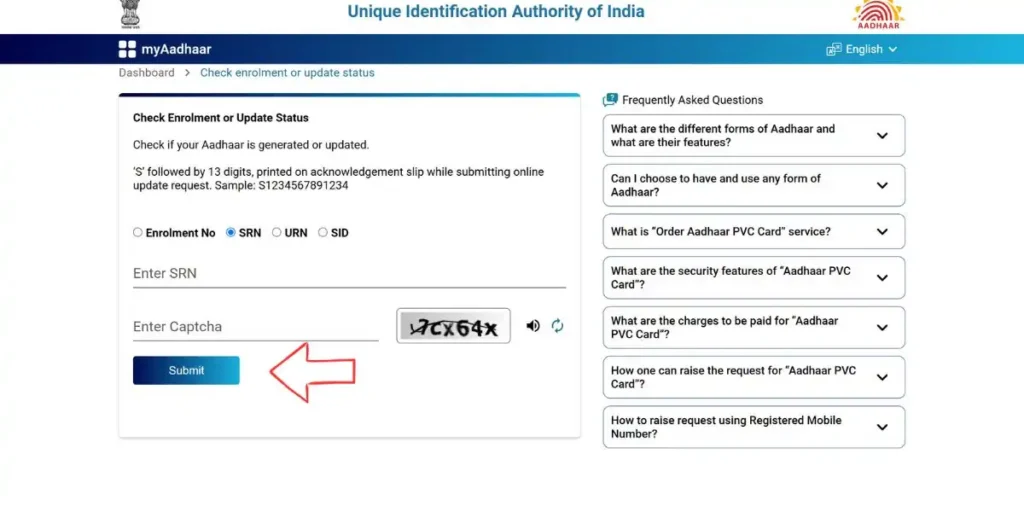
- Open the Check Enrolment & Update Status page on the portal.
- Enter your 14-digit SRN (e.g.,
Sfollowed by 13 digits) or 14-digit URN in the input field. - Fill in the Captcha verification code carefully.
- Click Submit to view the live progress of your update request.
Once your status displays “Your Aadhaar has been generated” or “Your update request has been completed,” you can immediately proceed to the Aadhaar Download Page to get your updated e-Aadhaar PDF.
Meaning of Different Aadhaar Status Stages on the Portal
When you click submit to check aadhaar status, the portal displays a 5-stage progress tracker along with a status message. Here is what each stage actually means:
- 1. Draft Stage: You have started an online update request on the My Aadhaar portal, but the final submission or ₹ 75 fee payment is still pending.
- 2. Payment Stage: Your payment is being processed by the bank gateway. If money was deducted and it stays stuck here, wait 24–48 hours for automatic reconciliation.
- 3. Verification / Validation Stage (Under Process): Your application and uploaded documents are currently being verified by a UIDAI backend verifier, or your biometric packets are undergoing quality and de-duplication checks at the central server.
- 4. Completed / Aadhaar Generated: Congratulations! Your new Aadhaar card or update request has been approved. You can now download your digital copy online while the physical letter is printed and dispatched via India Post.
- 5. Rejected: Your application could not be processed due to an error. The portal will display the exact reason for rejection right below the progress bar.
Common Reasons Why Aadhaar Enrolment or Update Gets Rejected (And How to Fix)
If you check aadhaar status and see that your request was rejected, do not panic. Here are the most common rejection reasons and their solutions:
- Rejected Due to Invalid Documents / Document Mismatch:
- Reason: The Proof of Address (PoA) or Proof of Identity (PoI) document you uploaded was blurry, expired, not in your name, or not on UIDAI’s official list of acceptable documents.
- Fix: Re-apply with a clear, color-scanned original document (in PDF or JPEG format) where your name and details match your Aadhaar request.
- Rejected Due to Duplicate Enrolment (Biometric Match Found):
- Reason: If someone who already has an Aadhaar card applies for a new enrolment instead of an update, UIDAI’s biometric de-duplication system detects that their fingerprints/iris already exist in the database and rejects the new application.
- Fix: Use the “Retrieve EID / Aadhaar Number” service on the portal or call
1947to find your original 12-digit Aadhaar number instead of enrolling again.
- Rejected Due to Technical / Packet Error or Operator Mistake:
- Reason: Sometimes data packets uploaded by the Aadhaar Seva Kendra operator get corrupted during server transmission or lack mandatory supervisor signatures.
- Fix: Visit the Aadhaar Seva Kendra with your acknowledgement slip and ask them to re-process the enrolment/update free of charge.
How Long Does It Take for Aadhaar Generation or Update?
| Type of Request | Normal Processing Time | Maximum Time Limit (Official SLA) |
| Online Address Update (via SRN) | 3 to 7 Working Days | Up to 30 Days |
| Biometric / Photo / Mobile Update (at Seva Kendra) | 5 to 10 Working Days | Up to 30 Days |
| New Aadhaar Enrolment (Children & Adults) | 7 to 15 Working Days | Up to 90 Days ( Up to 180 days for adult 18+ physical verification) |
| Aadhaar PVC Card Order & Delivery | 5 to 15 Working Days | Dispatched within 5 working days via Speed Post |
Alternative Ways to Check Aadhaar Status Offline (Without Internet)
If the UIDAI server is temporarily busy or you do not have internet access, you can also check your status using your phone:
- Via Toll-Free Helpline (1947): Dial 1947 from your mobile phone, select your preferred language in the IVR menu, press
1to check enrolment or update status, and enter the first 14 digits of your EID or URN using your keypad. The automated system will read out your current status. - Via mAadhaar App: Download the official mAadhaar app from the Google Play Store or Apple App Store, tap on Check Request Status on the main dashboard, and enter your EID or SRN.
Frequently Asked Questions (FAQs)
-
Can I check Aadhaar status by name and date of birth without an Enrolment ID?
Directly checking status requires an EID, SRN, or URN. However, if you lost your acknowledgement slip, you can first use the “Retrieve EID / Aadhaar number” tool on the My Aadhaar portal by entering your Full Name, registered Mobile Number, and OTP. UIDAI will send your 28-digit EID or 12-digit Aadhaar number via SMS, which you can then use to check your status.
-
Why is my Aadhaar update status stuck at the “Validation Stage” for more than 15 days?
The Validation Stage takes time because human verifiers at UIDAI Regional Offices manually inspect your uploaded documents and match them against your demographic request. By law, UIDAI takes up to 30 days for updates. If it exceeds 30 days, you can file a grievance online or call
1947. -
My Aadhaar status shows “Generated,” when will I receive the physical card by post?
Once your status changes to “Generated” or “Completed,” UIDAI prints and hands over the physical letter to India Post within 5 to 7 days, and it typically reaches your residential address within 15 to 30 days. Meanwhile, you do not need to wait—you can instantly download the e-Aadhaar PDF online.
-
Will I get a refund of the ₹ 75 fee if my online address update request is rejected?
No, as per UIDAI policy, the ₹ 75 service fee charged for online address updates or biometric updates at Seva Kendras is a non-refundable processing fee, even if the application is rejected due to invalid documents[cite: 1, 3]. Always verify your supporting documents carefully before submitting.